


HAProxy’s developers define the tool as a “free, very fast and reliable solution offering high availability, load balancing, and proxying for TCP and HTTP-based applications”. HAProxy is suited for high traffic sites, and is responsible for powering a number of the worlds most visited websites including Booking.com, GitHub, Stack Overflow, and Vimeo . The tool has become an industry standard when it comes to open source load balancing, and is available on most mainstream Linux distributions and often deployed on cloud platforms.
HAProxy offers a multitude of features that make it one of the best load balancers available.
Layer 4 (TCP) and Layer 7 (HTTP) load balancing:
HAProxy can be configured as a network load balancer, or as an application load balancer.
Sticky Sessions:
While load balancers are of great service to applications, the problem arises when the load balanced application uses sessions. By default, load balancers bounce traffic from one server to another, so if a user logs into server A, their session data will be saved on the server, but the next request from the same user might be routed to server B where no session data was saved, prompting the user to login again. HAProxy solves this problem by using sticky sessions. By enabling sticky sessions, HAProxy assigns a cookie for a client when their first request is routed to a server, thus the client will be “stuck” to a certain server, and the next requests will be routed to the server that carries the cookie value set in the first request. Which means that if the client logs in on server A, all recurring requests will be routed to server A until the sticky session cookie expires.
Multiple Balancing Algorithms:
HAProxy supports most major load balancing algorithms out of the box. The available algorithms are: roundrobin, static-rr, leastconn, source, uri, url_param, hdr, and rdp-cookie.
Full HTTP keep alive:
HTTP keep alive, also known as HTTP persistent connection, is a protocol that allows a single TCP connection to stay open for multiple HTTP request/responses. Normally when a client requests a page from a server, the server opens a new connection for each object it returns to the client. With Keep alive enabled, one connection is established per session. Enabling this feature decreases network overhead and provides great performance gains. HAProxy tries to keep connections on both the client and server side open until the client requests the server to close the connection, or a timeout occurs.
Health Checks:
HAProxy offers two types of health checks, TCP and HTTP checks. A TCP check verifies if the server is available before routing any traffic to it, but does not check the status of the application running on top of the server. HTTP checks verify that the request URL is working properly. With HTTP checks enabled, HAProxy checks the returned status code from the server and acts accordingly. For example, if the response status is 500, the server is marked as offline.
HTTP/1.1 compression:
HTTP compression is a technique that allows a server to compress the body of a response before it's forwarded to a client, which enables faster delivery since the size of the response is reduced. When a client sends an HTTP request, it announces the compression algorithm it supports using the Accept-Encoding header field. The server can compress its response using any algorithm supported by the client. Since HAProxy is usually situated between clients and the servers, it can compress responses if a server does not do it for a client that supports it.
The above mentioned features are the most commonly used features in a typical HAProxy configuration. There are many other features available including the following:
• SSL Termination
• URL rewriting
• Rate Limiting
• GRPC Support
Configuration
Note: This setup does not 100% replicate the actual communication between the client and the server. The client in this scenario is represented by a device within the same network as the other servers, this minor change does not affect neither the configuration nor the functionality of HAProxy in any way.
The main components of the setup are:
- The Web Application:
A sample Node.js content management system application hosted on two Linux servers.
- Server 1:
Ubuntu server 19.04 running on top of a virtual machine with 1GB RAM with Node.js and a copy of the web app installed.
- Server 2:
Ubuntu server 19.04 running on top of a virtual machine with 1GB RAM with Node.js and a copy of the web app installed.
- LB (Load Balancing) server:
Ubuntu 19.04 running on top of a virtual machine with 4GB RAM, and HAProxy 1.8.19 installed.
- Host Machine:
Windows 10 Machine, launches the 3 virtual servers, and acts as the client that is sending requests to LB server.
Server1 and Server2 are the web servers running the application. Since the web app is a Node.js application, Node is installed on both servers. The application listens for requests on port 3000 on both servers.
The Network is comprised of the host machine and the three virtual machines mentioned above with each of the virtual machines having two network interfaces, a NAT interface for internet access, and a Host-only VirtualBox network interface. The topology is better illustrated through the following diagram:
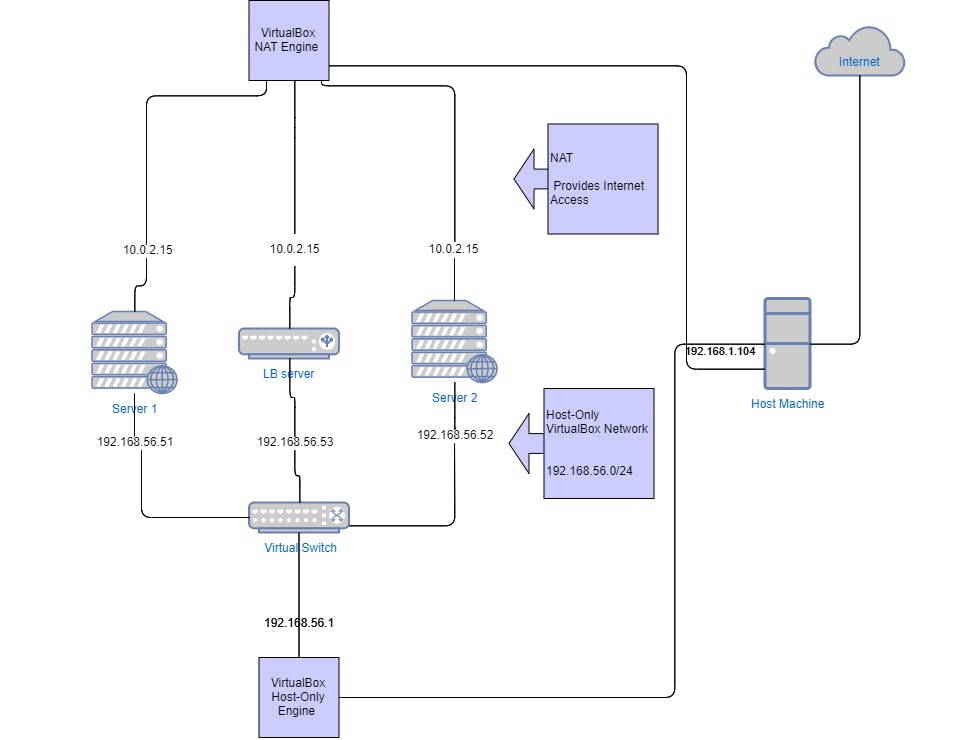
As shown in the above topology, the three servers server1, server2, LB server and the host machine belong to the same network 192.168.56.0/24. All three servers are assigned static IP addresses, which allows the host (acting as the client) to send requests to LB server using its IP address, and LB server to manage the requests and fetch responses from server1 and server2.
Once the Network is fully setup and functional, it’s time to configure HAProxy The configuration of HAProxy is done on LB server. The step by step process is outlined below.
Step 1:
Boot into LB server and login (The user should be a sudoer). Open terminal, and install HAProxy by typing:
sudo apt-get -y install haproxy
Verify the installation:
haproxy -v
The server should respond with the version number of HAProxy.
Step 2:
There are four essential parts of an HAProxy configuration:
global: Settings under this part define process-wide performance and security tunings.
defaults: Using a defaults section helps reduce duplication. Its settings apply to both frontend and backend sections that follow it. Those settings can be overridden in subsequent sections. Multiple defaults sections can be defined, each overriding the preceding one.
frontend: A frontend section defines the IP addresses and ports clients can connect to. Multiple frontend sections can be added in the same configuration file.
backend: A backend section defines a pool of servers that the frontend will forward requests to.
The main configuration file is located at /etc/haproxy/haproxy.cfg, it contains the default settings. For now, navigate to the frontend and backend sections.
Step 3:
In the frontend section, define the IP address and port number that the client will use to send requests to the server. In this example the IP:Port combination is: 192.168.56.53:80
frontend loadbalance
bind 192.168.56.53:80
default_backend webservers
default_backend directive tells the load balancer to forward requests to a pool of servers in the backend section named webservers.
In the backend section, define the IP addresses and port numbers of the servers that run the web application.
backend webservers
server server1 192.168.56.51:3000
server server2 192.168.56.52:3000
Step 4:
The routing algorithm used should also be added in the backend section, for the following example round robin is chosen.
balance roundrobin
Step 5:
Save the changes made and start HAProxy:
sudo systemctl start HAProxy.service
The Load balancer should be up and running. Launch the application instance on server1 and server2 and visit 192.168.56.53 on the host machine, the web app should be displayed. To check if the requests were served on both servers, check the haproxy.log file located at the path /var/log/haproxy.log.
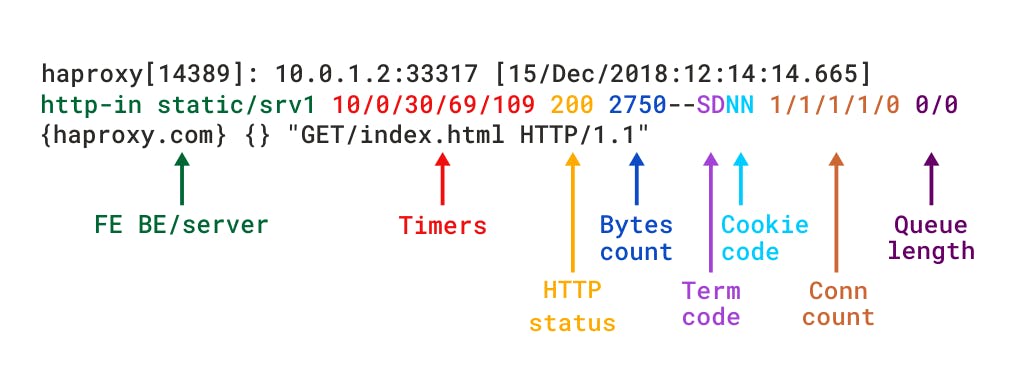
According to the above figure, each log line can be dissected into the following:
- Client IP address and Port number: 192.168.56.1:44395
- Time and date of the request: [03/Mar/2020:23:18:10.888]
- Name of frontend section: loadbalance
- Name of the backend section: webservers
- The web server the request is routed to: /server2
- Timers: 0/0/1/2/3
- HTTP status: 200
- Bytes count: 285
- Connection count: 8/8/0/1/0
- Queue length: 0/0
The part that’s worth noticing here is the web servers part. In the first line of the logs, server2 is the web server that received the request from HAProxy. However, the second line shows that server1 received the request from HAProxy. These two parts keep changing in the next lines in roundrobin fashion, which indicates that HAProxy is working as expected. The bare bones configuration of LB server is done. This configuration however, is not enough for the web application to function normally. Up until now HAProxy can only route traffic, but it can do much more. There are several options available to optimize and enhance the load balancer. These options are covered next.
- Forwardfor Option:
Since HAProxy works in reverse-proxy mode, the servers see its IP address as their client address, thus it has the option to add the "X-Forwarded-For" HTTP header to all requests sent to the backend servers. This header contains a value representing the client's IP address.
To add the forwardfor option, edit the haproxy.cfg file and in the frontend section add:
option forwardfor
- Health Checks:
To enable HAProxy to perform health checks on server1 and server2, append the keyword “check” to the IP address assignment in the backend section:
server server1 192.168.56.51:3000 check
server server2 192.168.56.52:3000 check
- Sticky Sessions:
Sticky sessions are configured with the following two lines added in the backend section:
cookie SRVID insert indirect nocache
server server1 192.168.56.51:3000 check cookie s1
server server1 192.168.56.52:3000 check cookie s2
Line 1: the name of the cookie SRVID to set on first client request.
Line 2: the value to set the cookie SRVID=s1 in case traffic is routed to server1.
Line 3: the value to set the cookie SRVID=s2 in case traffic is routed to server2.
- HTTP Compression:
To enable HTTP compression, add the following lines to the backend section:
algo gzip
compression text/html text/plain text/css
HAProxy disables HTTP compression when:
• The request does not advertise a supported compression algorithm in the Accept-Encoding header
• The response message is not HTTP/1.1
• HTTP status code is not 200
Combining all the above options, the final configuration file should look like the following:
global
    log /dev/log    local0
    log /dev/log    local1 notice
    chroot /var/lib/haproxy
    stats socket /run/haproxy/admin.sock mode 660 level admin expose-fd listeners
    stats timeout 30s
    user haproxy
    group haproxy
    daemon
    # Default SSL material locations
    ca-base /etc/ssl/certs
    crt-base /etc/ssl/private
    # Default ciphers to use on SSL-enabled listening sockets.
    # For more information, see ciphers(1SSL). This list is from:
    #  https://hynek.me/articles/hardening-your-web-servers-ssl-ciphers/
    # An alternative list with additional directives can be obtained from
    #https://mozilla.github.io/server-side-tls/ssl-config-generator/?server=haproxy
    ssl-default-bind-ciphers ECDH+AESGCM:DH+AESGCM:ECDH+AES256:DH+AES256:ECDH+AES128:DH+AES:RSA+AESGCM:RSA+AES:!aNULL:!MD5:!DSS
    ssl-default-bind-options no-sslv3
defaults
    log    global
    mode    http
    option    httplog
    option    dontlognull
        timeout connect 5000
        timeout client  50000
        timeout server  50000
    errorfile 400 /etc/haproxy/errors/400.http
    errorfile 403 /etc/haproxy/errors/403.http
    errorfile 408 /etc/haproxy/errors/408.http
    errorfile 500 /etc/haproxy/errors/500.http
    errorfile 502 /etc/haproxy/errors/502.http
    errorfile 503 /etc/haproxy/errors/503.http
    errorfile 504 /etc/haproxy/errors/504.http


frontend loadbalance
    bind 192.168.56.53:80
    option forwardfor
    default_backend webservers

backend webservers
    balance roundrobin
    compression algo gzip
       compression type text/html text/plain text/css
    cookie SERVID insert indirect nocache
    server server1 192.168.56.51:3000 check cookie s1
    server server2 192.168.56.52:3000 check cookie s2